
Using a Perpetual Calendar

We've all seen pictures of beautiful pinterest-worthy planner spreads and hoped we could one day make something as stunning. I'm guilty myself of occasionally "planning for the picture." Hundreds of thousands of planners are sold every year and a disproportionately high number of the "pretty" ones wind up on the internet. For me, sometimes, what is behind the camera is another struggle entirely. Even though I'm new to this, some people have told me they find MY plans inspiring, which I still find hard to believe!
15 Things To Do This Summer
Summer Bucket List - Family of Four (Kids under 3)
It's officially summer in our home! With two educators and two kids, not yet in school, you can understand our excitement.
Apollo is just under three years old and Aria a few days from turning one - we have to be creative. During the last few weeks of school, I began to brainstorm different ideas to keep our family entertained in my Limelife Planners A6 lined notebook.
This size went along with me very easily from home to work because it fits nicely in my work bag and diaper bag.
What's missing from this list? Anything you're planning to do with your family this summer break?
Even though the school year just ended/is ending soon, it’s getting to be time to think about your planner for the next school year! The great thing about Limelife is that there are so many great layout options. I’ll be showing you how I used Layouts B and C as a college student. (Note that Layout C has been updated slightly since I purchased mine, so it looks a little bit different in my pictures than it will if you order one—remember, you can always see what the layouts look like and try them out before you buy.)
This last school year was my first year using a Limelife Planner, and WOW was it great! I’ve always used a planner, but I hadn’t found a layout that I absolutely loved…until I tried Limelife’s Layout C. I used Layout C for the whole school year, and decided to order Layout B as my next planner since I’ll be transitioning from student to a 9-5 employee.
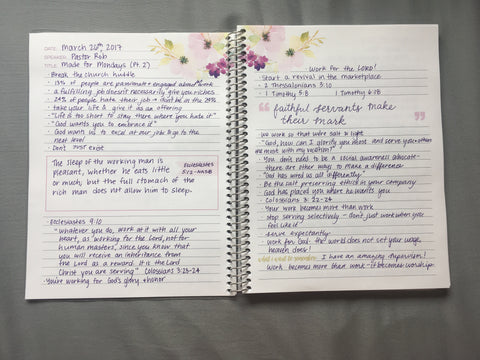
I loved the six boxes of Layout C and how easy it is to customize them. Because I had a consistent schedule, I mostly kept the boxes the same for an entire semester. If you plan to keep your boxes the same for several months, check out these wonderful customizable box labels!
Here’s how I used the boxes in Layout C:
Class #1
Class #2/Job & Apartment Search (This class was only for the first half of the semester, so once that was done I changed up my labels.)
Class #3
Class #4
Work
Misc (Social Events, Extra Curriculars, Errands, etc.)
I use the boxes for my classes to write down homework for the next class period and big projects or exam dates.
Here’s how the same week looks planned in two different layouts (top is B, bottom is C)!
A little disclaimer about Layout B (hourly): I didn’t get it for college, I got it to start using after my Layout C planner finishes up soon. Though the hourly layout was alright, it wasn’t as great of a fit for my college schedule. I found it to be redundant writing out my class times that are the same every week, and it’s more structured than I liked, especially for homework. However, I loved using an hourly planner for my internship last summer, because meetings were always at different times each day/week, and no two days were the same. That’s why I got a new hourly planner to use for my first adult job!
While I don’t have experience with any other layouts as a college student, I’d highly recommend Layout C for your next academic planner! As a student, another thing I love about Limelife over other planner brands is that you can pick your starting month. No more having to buy a January start and have one academic year in two calendar year planners!
Start thinking about what planner you want to use next school year, and order soon! There’s still plenty of time to order in time for August or September, but remember to allow about 3 weeks from the time you order for all of the customization goodness that Limelife does + shipping. That would mean ordering in early July if you want an August start!
Ready to buy your next planner or other Limelife goodies? Have fun shopping—here’s $10 off!
Follow me on Instagram @live.life.inspired or check out my blog to see more Limelife goodness!
If you're like most of us, January began with a commitment to having a stronger hold of your finances. February was good, too. I mean it was only 28 days! Then all of the pretty things caught your eye and - whoops! What budget?
Marketing, spring fever, retail therapy - whatever caused this budget slip, it happens. The great thing is, you can get back on budget TODAY.
Before we get into the steps, I do want to say that l believe a budget should have built-in opportunities for you to have fun. There should be fun money/blow money/allowances for you to enjoy things that you like. Even after going off track.
Okay, so...
1: Start today!
Mistakes happen. Don't beat yourself up about it. Get back on track by recommitting to your budget today. Maybe the mistake was that your budget needed a little tweaking. Did you forget to build in that fun money? Whatever it was, focus on moving forward.
2: Write it out.
If you are not writing out a plan for your budget, stop reading after this step and get to it! This is essential for getting back on track. Write down what you plan to use your income for. Plan for it all of the way down to the last penny. (Zero-based budgeting) Hello - savings! I'm a tried and true fan of The Total Money Makeover. A [written] budget is telling your money where to go, instead of wondering where it went. (Dave Ramsey)
3: Assess What Happened
It's easy to get off track with your budget if you cannot see where your money is going. Not only should you write down what you plan to do with your income, you should write out what actually happens. Last month, we were hit with several Dr. visit co-payments when our youngest caught a nasty virus. Fortunately we'd started a sinking fund for medical payments. I wrote all of that out in my budget notebook because it helped us to better understand where our money went and how much we need to adjust our budget for future months.
4: Make Adjustments
As I mentioned before, you should have fun. Budgeting is not a way to eliminate the things that you want. Following a budget should put you in a place of confidence when you're making a purchase. Confident that the money isn't needed for something else, confident that your necessities are taken care of, and confident that the card transaction won't be declined. Each month will be different. Some months you'll need a oil change or a new transit pass. Some months, you won't. It's so important to plan out each and every month. I really like having the budget notebook because I can see when certain annual or semi-annual payments are, right away. Revisiting your budget each week may even be necessary for the first few months. Things shift and you will have to plan for it.
5: Celebrate your success
Going from no budget to a zero-based budget may feel like a big step. I get it. How do you keep on track? You celebrate the baby steps. Stay within budget, of course. Small celebrations don't have to cost money. Let's say you get back on track and have a full two weeks of on-budget-spending. Celebrate! Spend an extra 10 minutes in your bubble bath or watch an extra episode of whatever show you're trying not to completely binge watch. You deserve it! You adulted and adulting is hard.
Let me know in the comments how you're doing on your 2017 budget. Also, check out the budget notebook that I use in the Limelife Planners Shop.
Hey fellow Limelife lovers! I’m Erin, one of the new Media & Creative Team members. Today I want to show you how I’ve been using my Sermon Notes notebook! As a college student living away from home, I typically watch my home church’s sermons online. I do this either by live-streaming it or watching the recording later in the day/week. I’m thankful that my church provides the sermons online so they can be viewed at any time, and over and over again! While it’s not the same experience as being AT church, it is better than nothing!
I wasn’t really a note-taker in the past at church, but sometimes I would find myself wishing I had written something down. Then I discovered Limelife’s Sermon Notes notebook! It’s a beautiful 7x9” notebook with space to take notes for 64 sermons. I love the size of the notebook; it has a good amount of writing space for each sermon, but it’s not too big to toss in my purse! While the cover it comes with is wonderful, you can also pick a different cover if you’d like (I got the standard cover). For those of you who are loving traveler’s notebooks right now, it also comes in Cahier and A6 (both have room for notes on 13 sermons).
One thing I like about watching it online is being able to pause the video when I want to write something down. I am able to watch the sermon at my own pace, which is great. Here’s what my first spread in my Sermon Notes notebook looked like!
I love the flexibility that this notebook offers, while still providing some structure for the date, speaker, and title of the sermon, along with a box on the left and a quote and “what I want to remember” area on right. For example, in the box on the left side of the spread, sometimes I hand letter a short phrase or quote from the sermon, while other times I write out something longer like a Bible verse.
The notebook is made of the same lovely paper that Limelife uses for their planners. I’ve been using a purple Ink Joy Gel pen (my favorite pens at the moment), and I haven’t had any issues with the ink bleeding through, even where I did some hand lettering. It shadows just a tiny bit, but that doesn’t bother me at all!
This sermon notebook would be great if you usually take notes on the back of your church bulletin, or if you’re like me and wish you would take notes but not have a place to keep them. You can also use the notebook for taking notes on special church events, conferences, or guest speakers in addition to taking notes on the regular weekend sermons.
If you’re new to Limelife and would like to try the Sermon Notes notebook, you can get $10 off your purchase!
Follow me on Instagram @live.life.inspired or check out my blog to see more of my sermon notes and planning goodness!
Hey Planner Friends!
Hello Planner Friends! I am so, so excited to share with you how I created this layout with you. Masking is a great way to combine creative with function in our planners. We can use bigger, decorative stamps in our layouts, without taking up all our planning space. This stamp set I used in my decorating is a space theme, and I wanted to be able to use lots of the planets, but not take up all my room for all our real life stuff that needs to go in there. I also wanted to “paint on” ink using a sponge to get a whimsical outer space look. So let”s jump in!
First I laid the foundation of the layout by choosing a darker purple ink and used a sponge to blot and smear ink the ink around the edges of the pages and in my notes section. There are two main ways I mask in my layouts. The first is to stamp an image on a scrap piece of paper and fussy cut it out. I then stamp then use that to cover up an image I don’t want to get ink on. That’s what i did in the following photo for the rocket ship.
The second is to use post it notes to block off sections that I don’t want to stamp on or ink or to partially stamp an image on the paper.
To really give this layout an outer space look, I used a white gel pen to add stars. Gel pens can be temperamental, so to get the ink flowing I always do small circular motions on my thumb, and then I don’t have any problems with a good ink flow on the paper, especially when using it on pigment ink. It’s important to vary the size of the dots, otherwise it will end up looking like snow!
I also stamped some images on sticker paper to color and use in my Notes section. Colored pencils are my go to, and the blending pencil is amazing for blending colors together. For example, I colored one planet a light pink color all over, and then went over the pink in sections with a purple pencil using medium pressure. I then took the blending pencil and used soft circular motions to blend the purple out giving the planet a more interesting and dimensional look. The nice thing about stamping decorative images on sticker paper is that I can move them all around before I decide on where to stick them in my layout.
I saved my planner stamping for the end of this layout. Since I went pretty heavy on the decorative stamping this week, I needed to make sure I could still fit my lined boxes. That’s the great thing about stamps! You can see perfectly how they will fit, and you can easily mask off to make a box smaller if you need to! I wanted to keep with the outer space theme, so I used star check boxes and a star header box, and chose an ink that would compliment my stars and sky.
Thank you for stopping by and checking out my blog post. Have fun with your planner, try new things, and I hope that I have made planner stamping a little less intimidating.
Lindsay IG: @glam2plan_pnw